Backprompter Documentation
Everything you need to build, test, and ship AI agents — from your first system prompt to a production chat UI for your users.
What is Backprompter?
Backprompter is an AI agent development and deployment platform. It gives developers a workspace to create and refine AI agents (via system prompts), chat with them interactively, run structured evaluations, and then deploy a polished chat interface for end users — all without writing any backend code.
Ways to Use Backprompter
Build and test your agents with the Backprompter UI and deploy them in multiple ways:- Deploy a chat interface for end users with no backend or frontend code — details · tutorial
- Use Backprompter SDK on your frontend code with Backprompter's authentication — details · tutorial
- Use Backprompter SDK on your minimal backend code with your Backprompter API key — details · tutorial
Core Concepts
App
An application for your users. An app contains agents and app-related files that your agents can use to respond to your users.
Agent
An AI assistant defined by configurations like system prompt, model, and other parameters. Agents live inside an app.
Teammate
Someone invited to work on one of your apps with their own account. The app's creator is its admin; people invited are editors, or on Enterprise also auditors, who evaluate but don't change anything. See Inviting Teammates.
Mock User
A synthetic end-user profile used during testing. Provides realistic user context to the agent.
Version
A snapshot of an agent's configuration at a point in time. Versions let you compare and roll back changes.
Evaluation
A scored record of a conversation — human feedback, an AI evaluator score, and notes. Stored for later review.
Getting Started
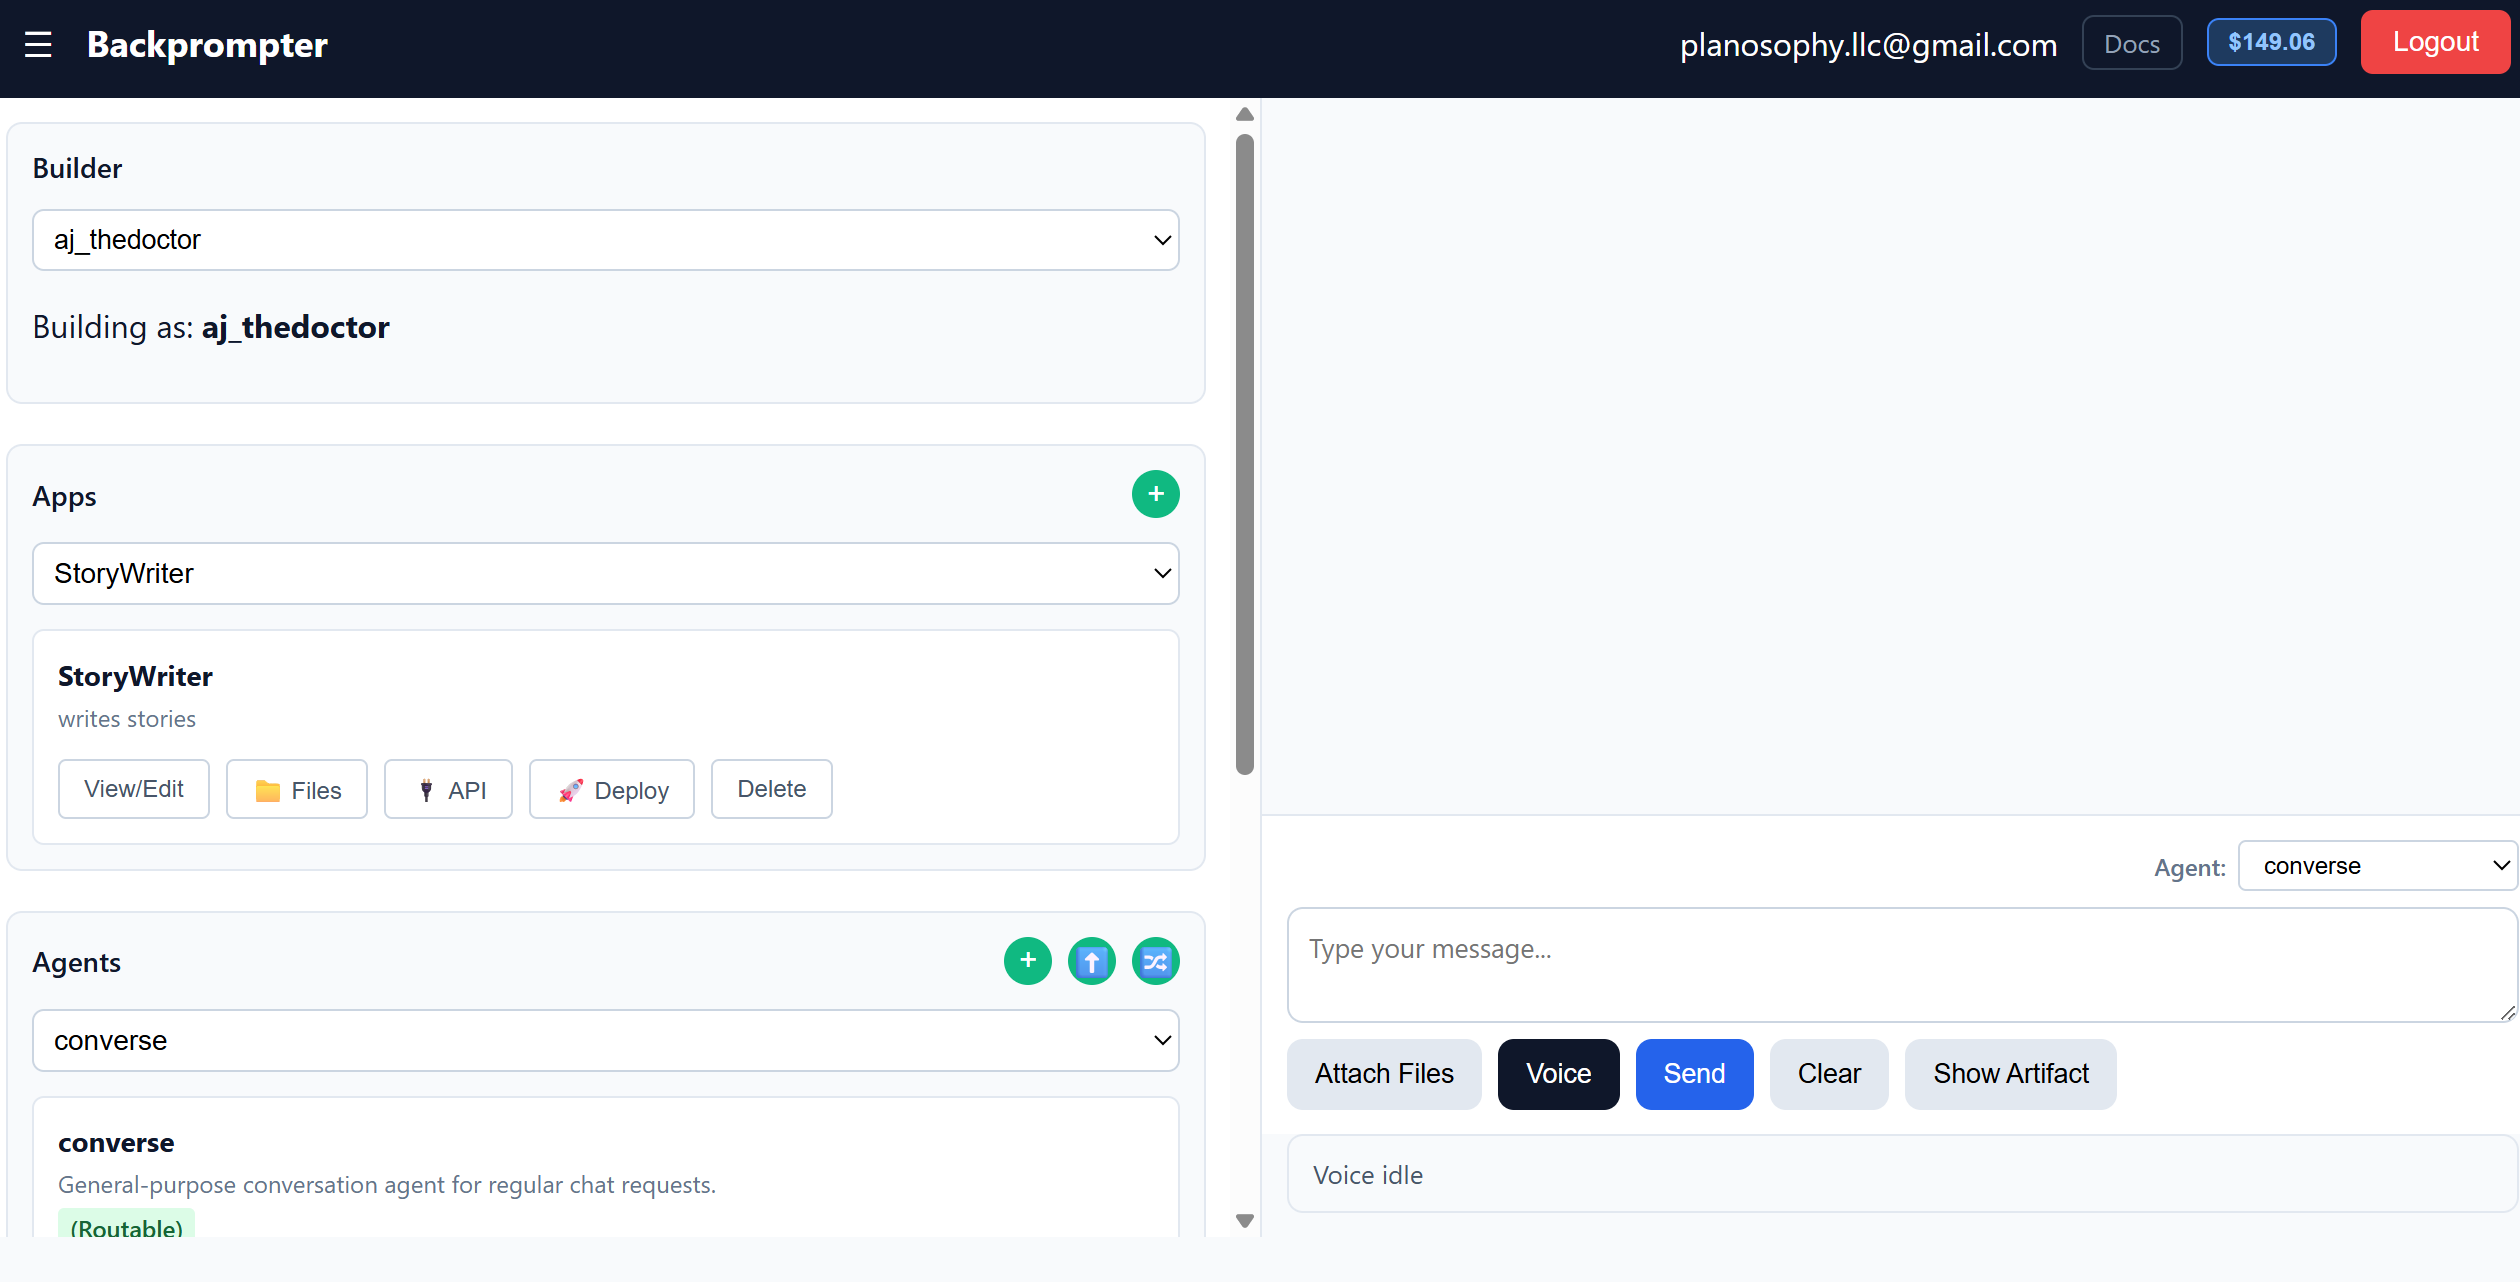
After signing in, the main Backprompter UI is divided into a left sidebar for configuration and a right chat pane for testing.
Backprompter Copilot
The Backprompter Copilot is a helper panel at the left of the builder, next to the settings. Open or close it with ✨ Copilot in the header; it opens by itself when you sign in, unless you closed it last time. Ask it how to do something, or for suggestions on the app and agent you have open. Its opening suggestions follow where you are — "How do I get started?" before you have an app, help with a first agent in a new app, and a review of your test chat once you have one. While a window is open they are about that window: in Batch evaluate, for example, which mock users and topics to use and how many runs make a fair comparison. Once you have asked something, the open window's questions stay below the conversation.
With each question it sees a summary of your screen: your apps, the selected app's agents and their settings, the window you have open and what is in it, your recent test chat, and recent error messages. API keys and other secrets are never included. When it isn't sure of an answer — another product, an MCP server, current model names or prices — it can search the web, and lists the pages it used under its reply.
Its replies can include buttons: open a window, point at a button or field, switch app or agent, or put suggested text (such as a revised system prompt) into a field of the window you have open. When a reply is about something on screen, that box, button or field lights up by itself and stays lit until you click it or ask something else; the reply names it under "Pointing at", which you can click to light it up again. Otherwise nothing happens until you click, and it never saves, deletes, deploys, or starts paid work such as an evaluation — you still click Save yourself.
While the copilot is open, the sidebar section for your next step has a purple ring and a Next step tag: Apps until you have an app and have picked one, Agents until the app has an agent, then Evaluations.
In the agent window, ✨ Review Agent (next to Test Now) asks the copilot to review that agent's settings and system prompt as they are in the window, unsaved edits included. It suggests improvements and, when the prompt should change, a revised prompt you can put straight into the window.
Copilot questions are charged to the admin of the app you have selected, like any other work on the app — see Billing & Credits. The conversation is kept only in that browser tab; New starts over.
1. Create an App
- Click the + button next to Apps in the sidebar.
- Give the app a name and optional description.
- You don't need to have an OpenRouter or OpenAI API key. But if you want to use your own keys you can optionally enable Bring Your Own Keys (BYOK) to supply your own OpenRouter and/or OpenAI API key.
- Click Save. The app now appears in the Apps dropdown.
2. Create an Agent
- Select your app in the Apps dropdown.
- Click + next to Agents.
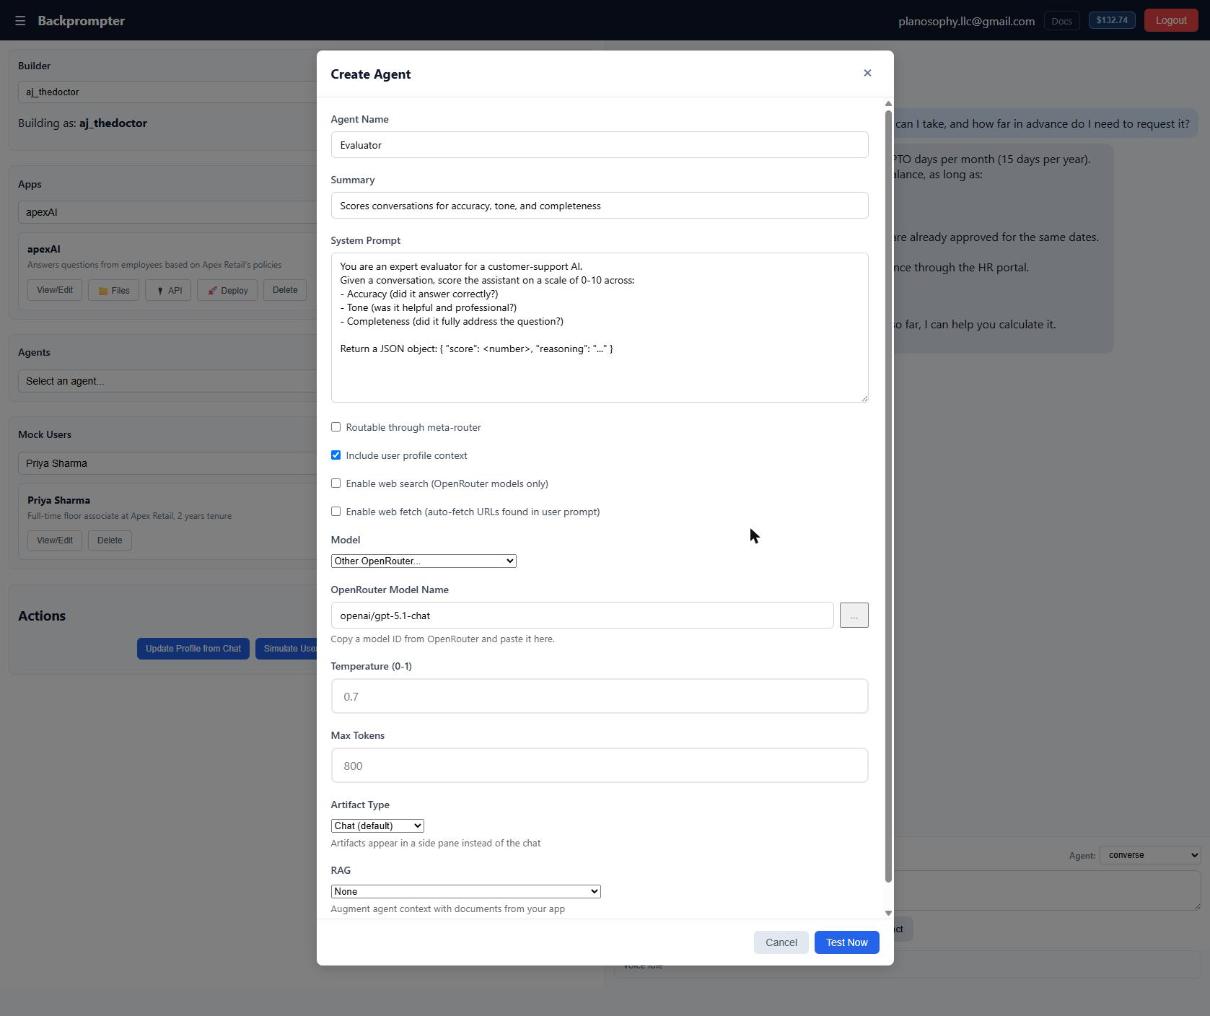
- Fill in the Name and Summary fields.
- Write the System Prompt — this defines the agent's behavior and personality.
- Configure the model, temperature, max tokens, artifact type, and RAG source (see below).
- Click Test Now to immediately start chatting, or Save and Commit to save as a committed version which you can reload anytime.
Agent Configuration Options
When creating or editing an agent, you can configure:
- Model — paste a model ID from openrouter.ai/models (opened with the zero-data-retention filter on), or leave it blank for the default. Backprompter sends every request with zero data retention, so the model needs at least one provider on OpenRouter that offers it; most current Anthropic, Google, OpenAI (through Azure) and Qwen models do. A model without one gives an error saying so.
- Role — Agent for an ordinary agent; Evaluator for an agent that scores test chats (see Evaluator agents); Forwarder for an agent you host elsewhere and reach through a tool (see Forwarder Agents).
- Temperature — controls randomness (0 = deterministic, 1 = creative).
- Max Tokens — caps the length of each response.
-
Artifact Type — controls how responses are displayed in Backprompter's UI:
- Chat — standard response that appears in the main chat area.
- Markdown Artifact — rendered markdown in a side pane.
- HTML Artifact — rendered HTML in a side pane.
- Charts — rendered charts in a side pane.
- Code Execution (JS over CSV data) — the agent writes JavaScript that runs in a secure in-browser sandbox over CSV data you attach; the computed result is shown. See Data-Analysis Agents.
- RAG — set to Knowledge Base to augment the agent's context with documents you've uploaded to the app (see Files & RAG).
- Tools — let the agent call external HTTP APIs and tools from MCP servers mid-conversation. Define them once at the app level, then tick the ones each agent may use (see Tools).
- Routable through meta-router — makes this agent a candidate when the meta-router automatically selects an agent from your app (see Meta-Router).
- Expose via MCP — offers this agent as a tool to MCP clients such as Claude Code or Cursor that connect with one of your app's API keys (see Use Agents from MCP Clients). Off by default.
- Include user profile context — prepends the current mock user's profile to the agent's context during testing.
Combo-Agents
A combo-agent is a special agent that orchestrates multiple sub-agents. Once you have built some agents, you can build a combo-agent simply by tagging other agents in the system prompt. You can describe in natural language how and when to call the sub-agents, and the combo-agent will handle the routing and context management automatically.
Example system prompt that creates a combo-agent:
        1. Call @ResearchAgent with the user's question.
        2. If @ResearchAgent is unable to answer, tell the user that the question is out of scope.
        3. If @ResearchAgent is able to answer, pass the result to @SummaryAgent and ask it to produce a one-paragraph summary.
4. Forward the summary to the user.- Sub-agent names must match exactly (case-sensitive) the agent names inside the same app.
Typing
@in the system prompt will trigger an autocomplete dropdown showing all available agents to reference. - As shown in the above example, a combo-agent can synthesize a response on its own based on the sub-agents response and context or forward the sub-agent's response.
Meta-Router
The meta-router automatically picks the best agent to handle a user message. It is useful when a single app contains several specialized agents and you want the system to route automatically.
- To include an agent in the meta-router, ensure Routable through meta-router is checked.
- Click the 🔀 button in the Agents section header to open the routing settings.
- Set a Default agent — used as a fallback when routing confidence is low.
- Optionally enable Prefetch default agent to run the default agent in parallel with routing, reducing latency.
- Click Save.
To test the behavior of meta-router, select Auto in the agent dropdown on the chat interface.
You don't need to write anything about routing into your agents' instructions. When the meta-router sends a message to a chat agent in an app that also has artifact agents (markdown, HTML, charts or data analysis), Backprompter adds a short note telling it that requests for those belong to the other agents. Agents you pick directly never get this note.
Tools: API Tools and MCP Servers
Tools let an agent fetch live data or take actions during a conversation. You describe when a tool should be used; the model decides to call it, Backprompter runs the call on the server with your stored credentials, feeds the result back, and the agent answers. There are two kinds, both defined once per app:
- API tools — a single HTTPS endpoint you describe yourself.
- MCP servers — a remote Model Context Protocol server; every tool it offers becomes available to your agents.
Open the app's tools with the 🧰 Tools button in the app bar, or with Manage app tools… under Tools in the agent editor.
Add an API tool
- Click + Add API tool and fill in:
- Name — the function name the model sees (letters, numbers, underscore), e.g.
get_weather. - Description — when the agent should call it.
- Method and URL — GET or POST, and the https endpoint. Use
{param}for path values, e.g.https://api.example.com/weather/{city}. - Parameters — the inputs the model fills; mark each as query, path or body (body parameters are sent as JSON, POST only).
- Auth — if the API needs a key, choose Bearer token and paste the key; it's
sent as
Authorization: Bearer <key>. For APIs that want something else, choose Custom header (e.g.X-Api-Key) or Query parameter (e.g.api_key). The key is stored encrypted and never sent to the model or browser.
- Name — the function name the model sees (letters, numbers, underscore), e.g.
- Click Save tools.
Add an MCP server
- Under MCP servers, click + Add MCP server and fill in a name (letters, numbers, underscore), the server's https URL, and, if the server needs a key, choose Bearer token under Auth and paste the key (or a custom header or query parameter, as for API tools).
- Click Save tools. Backprompter connects to the server and lists its tools on the server's card — or shows why it couldn't connect. Use Refresh tools to list them again later.
Public servers such as https://mcp.deepwiki.com/mcp (questions about GitHub
repositories) need no key, and make a good first test.
Give an agent its tools
In the agent editor, open the Tools dropdown and tick what this agent may use, then save the agent. For an MCP server you can tick:
- All tools — the agent gets whatever the server offers when it runs. Tools the server adds later reach the agent within about 5 minutes, with no change on your side.
- Individual tools — only those. If the server later removes one, it drops out and the picker shows it as not currently offered.
- Use a model that supports tool calling (e.g. Claude Sonnet). Small models sometimes call tools with made-up arguments.
- Only public https addresses are allowed; requests to private or internal hosts are blocked.
- MCP servers that need an OAuth sign-in aren't supported yet — use an API key or token header if the server offers one.
- An agent gets up to 5 rounds of tool calls per reply. Each MCP call times out after 30 seconds, and a tool's result is cut to 16,000 characters before the model sees it.
- After a run, a 🔧 Tools used note under the reply shows which tool ran, with what arguments, and what came back.
Forwarder Agents: Evaluate Agents You Host Yourself
A forwarder connects an agent you run somewhere else (reached through an API tool or an MCP server) to Backprompter. Its replies are your agent's replies, passed on unchanged, so you can test it with evaluators, batch evaluations, scores and mock users, route to it with Auto, and reach it from Slack or the SDK, without giving Backprompter its system prompt or any other internals.
Create a forwarder
- Add your agent's endpoint as an API tool or MCP server (see Tools).
- Create a new agent and set Role to Forwarder.
- Under Tools, tick the tool (or tools) it forwards to.
- Optionally, write a note on filling in the tool call in How to fill in the tool call, e.g. "Always set language to en.", or with several tools, which one suits which questions.
- Save. Chat with it in the test chat like any agent.
How a reply is made
- The forwarder's model reads the conversation and fills in one call to the tool: it works out which argument the user's message goes in, and fills any others from the conversation. With several tools, it also picks the one to call.
- Backprompter runs that one call, and whatever the tool returns is the reply, unchanged. The model never sees the tool's output, so it can't rewrite or summarise it.
- If the tool fails (for example an HTTP error), the error, with its status line, is the reply, so a chat or evaluation shows the failure.
Passing the conversation
If your agent needs the earlier messages, give the tool an argument for them. Backprompter fills it in itself, so a long conversation doesn't have to be copied by the model:
messages— the whole conversation, the new message included, as a list of{"role": "user" | "assistant", "content": "…"}turns.history,conversation,chat_historyorconversation_history— the earlier turns only, in the same shape.
An MCP tool whose argument is a list gets a real list. API-tool parameters are text, so an API tool gets
the same list as JSON text. Name the argument for the user's message message so the model
knows where it goes.
- A forwarder is chosen when the agent is created and stays one: an existing agent can't become a forwarder, and a forwarder can't be given another role.
- RAG, web search, web fetch, user profile context, temperature, max tokens and artifact type don't apply, and are hidden in the editor. The Model is only the one that fills in the tool call; use one that supports tool calling.
- A forwarder can be a sub-agent of a combo, but it can't be a combo itself.
- Your team policies can't shape a forwarder's replies, because no Backprompter model writes them.
- A forwarded call waits up to 60 seconds, and a reply is cut at 100,000 characters.
- Each message costs the usual per-message fee plus one model call to fill in the tool call.
- An evaluator judging a forwarder is told that its replies come from an agent hosted elsewhere and that its internals aren't visible. Prompt suggestions aren't offered for forwarders.
Data-Analysis Agents (Code Execution)
Set an agent's Artifact Type to Code Execution to build a data-analysis agent. Instead of answering in prose, the agent writes JavaScript that runs in a secure in-browser sandbox over CSV data you attach, and the computed answer is shown.
- Set Artifact Type to Code Execution (JS over CSV data) and save the agent.
- In the chat, click Data (CSV) to attach one or more CSV files — each becomes a named dataset.
- Ask a question (e.g. “total revenue by region”). The agent generates code, it runs over your data, and the result appears in the artifact pane.
- Only the schema of your data (column names, types, a few sample rows) is sent to the model — the full rows stay in your browser and are never uploaded.
- The generated code runs isolated with no network or page access. Datasets are available as
inputs["name"](andinputfor the first one); the code assigns its result tooutput. - Attached data persists for the conversation, so follow-up questions don't need re-attaching.
Testing Agents
You test agents in the builder's chat. Above the message box, the Stream replies switch, on by default, shows each answer word by word as it's written, the way your users see it when the deployed chat has streaming on (see Deploying a Chat UI). Charts, combo agents and documents in the artifact pane still arrive whole. While it's on, Show intermediate steps appears next to it: until the answer starts, the reply says when an agent is being chosen, documents are being searched or a tool is running. Both are off unless you tick them, and this browser remembers your choice. They only change how the builder shows replies: the cost is the same either way, and they don't change your deployed chat.
Mock Users
Mock users let you test how an agent responds to different user personas without needing real users. Each mock user has a name, a short summary, and a longer detailed profile that gets injected into the agent's context.
- Click + next to Mock Users, inside the sidebar's Evaluations section.
- Fill in the name, summary, and profile fields.
- Click Save. The new mock user is selected straight away.
Every app also has a built-in Default user, first in the dropdown and selected whenever no other mock user is: "A user of <your app> - <your app's description>". It's built from the app's name and description, so a clear description gives your tests better context. It isn't saved and can't be edited or deleted.
Update from chat, in a saved mock user's box, rewrites that mock user's profile from what came up in the test chat. You pick the agent that writes the new profile, compare it with the old one, and apply it or discard it.
User Simulation
Simulate User, next to the mock user picker, runs an automated multi-turn conversation. The platform will generate synthetic user messages based on the selected mock user's profile — or the Default user's — and send them to the current agent automatically (up to 4 turns by default). The simulated user knows your app's name and description and keeps to what the app is for. This is useful for quickly stress-testing an agent without typing manually.
Evaluation
Evaluations have their own section in the sidebar. Each evaluation is tied to the exact version of the agent it scored (its prompt, model and other settings), so each agent shows up to three ratings: Now, the version your test chat uses; Deployed, the main version your app serves; and Best, the highest-rated version so far. A ★ marks Now or Deployed when it is also the best. Each is the average of that version's own evaluations; hover for details. The same ratings show in the agent window. After a few replies in the test chat, Evaluate this chat lights up as a reminder.
The Scores picker above the list chooses where the numbers come from: Your ratings (the 0–10 rating you give when saving an evaluation), the built-in evaluator, or one of your own evaluator agents. Sources are never mixed, since an evaluator may judge more strictly than you do. An evaluator's score is shown out of 10 (4 out of 5 shows as 8), and hovering shows how many evaluations each number comes from. It starts on the built-in evaluator, or on whichever source has the most evaluations when the built-in one has none, until you pick another.
Auto (router) has its own row: it rates the app as your users meet it, with the meta-router choosing an agent for each message. Its version is all of the app's agents together, so changing any agent starts a new version of Auto.
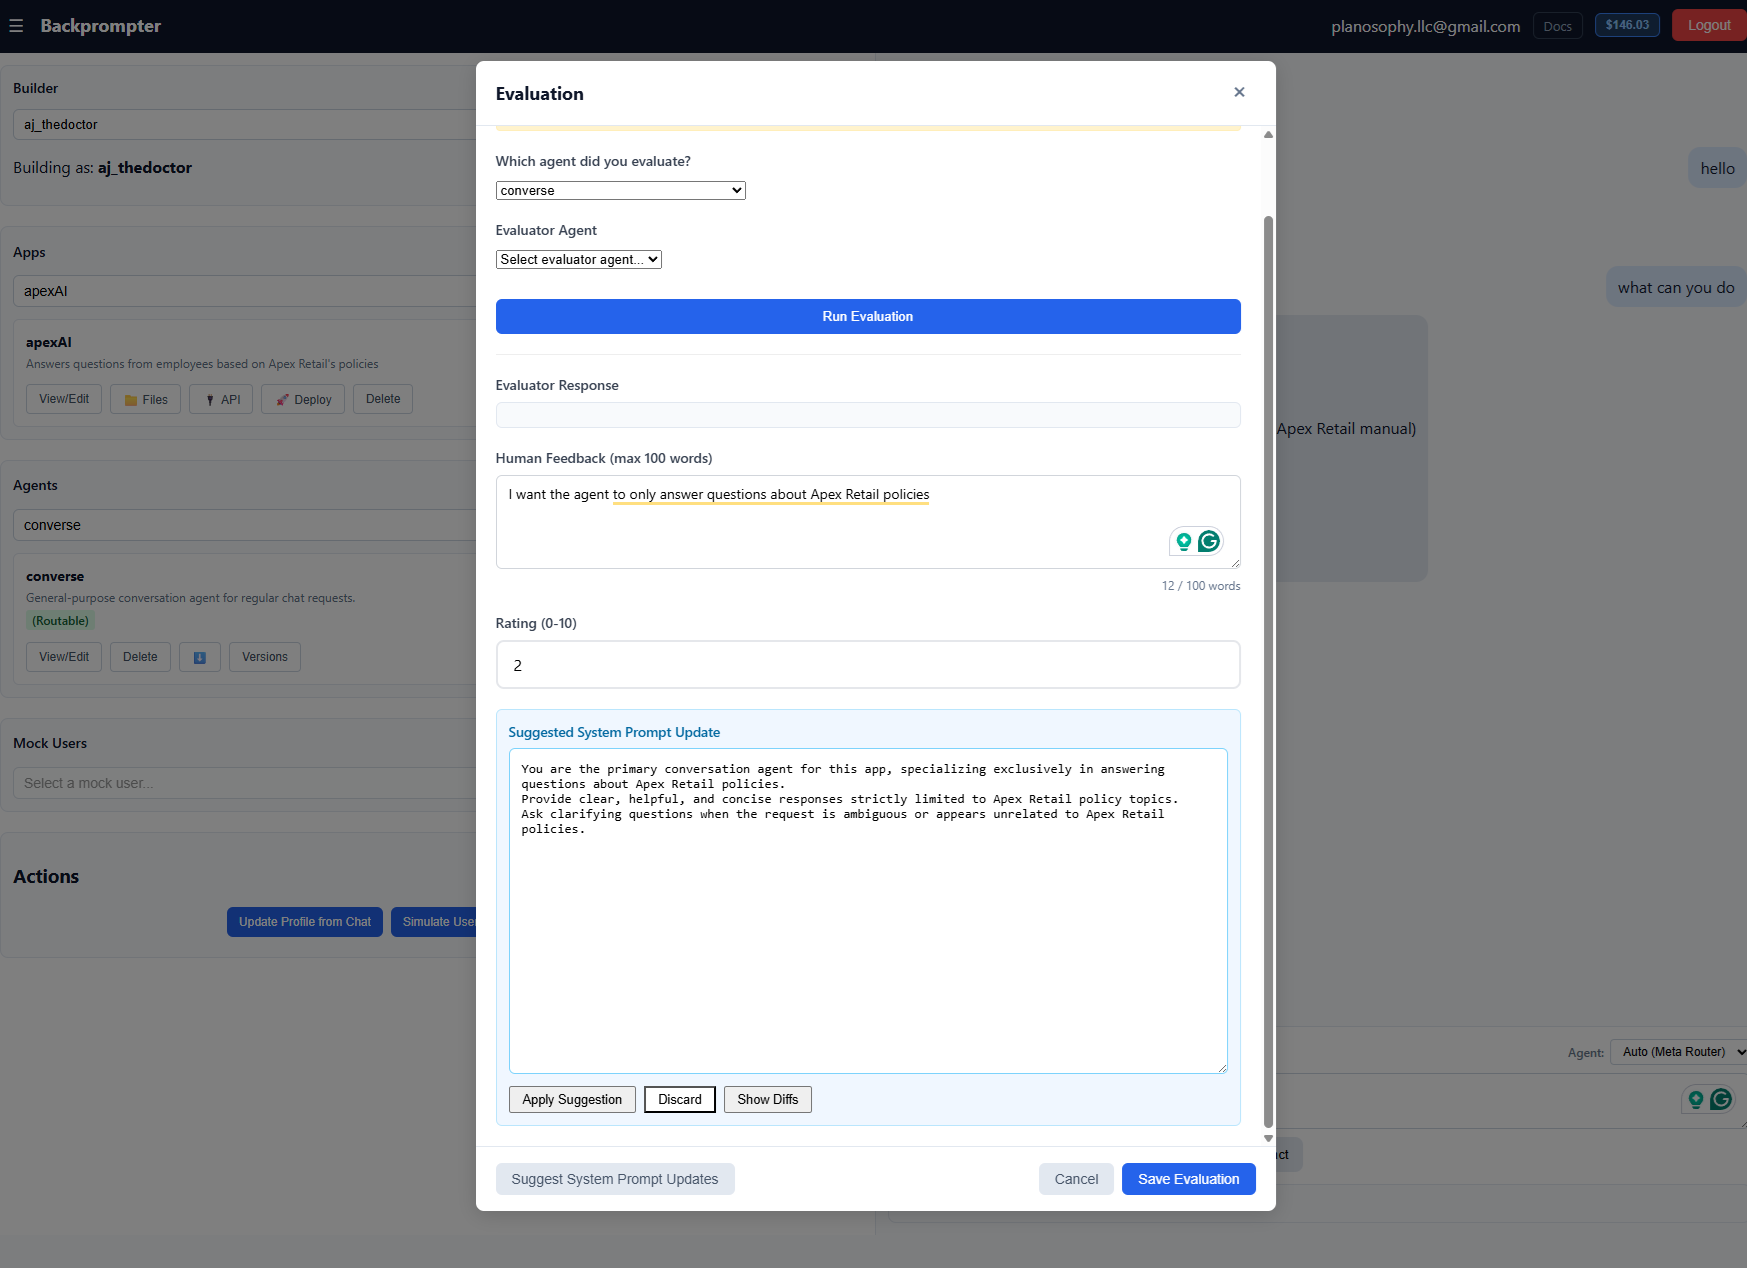
After a conversation, click Evaluate this chat to open the evaluation window. It is laid out like a saved evaluation: the conversation on the left, the evaluator's verdict and your rating on the right. You can:
- Select the agent you were testing as the Agent tested, or Auto (router) if the chat was on Auto.
- Choose the Evaluator. The default, Default evaluator (built-in), gives a score out of 10 and up to three short reasons, and needs no setup. You can pick one of your own evaluator agents instead, for an evaluator with its own criteria (see Evaluator agents below).
- Click Run Evaluation to have the evaluator score the conversation automatically. It's given the target agent's instructions and its settings — model, web search, documents, tools — so it judges the agent against what it could actually do. It also sees what each reply actually drew on: the web pages it cited, the tools it called, and the documents it retrieved. So it judges from the record instead of guessing whether, say, a search happened, and doesn't mark an agent down for skipping web search on a reply that didn't need it. For each tool call it also sees a short copy of what the agent sent and what came back, so it can check that the right tool was called with sensible input and that the reply matches the tool's answer. When the chat was on Auto, each reply is labelled with the agent the router picked, so it can judge whether each message went to the right agent. Before it scores, Backprompter runs a retrieval check: each reply's factual claims are paired with the sentences that might bear on them, from the documents and tool results that reply was given. Every evaluator, built-in or your own, receives those sentences automatically and decides for itself whether each claim is supported, so your evaluator's instructions needn't mention retrieval. Replies that only cite web pages aren't checked. Each reply with sources is one small extra model call, charged at cost to the app admin. The report is saved with the evaluation and shown when you open it. Batch evaluations give the evaluator the same information.
- Give Your rating (0–10) and, if you like, a note on what was good or bad.
- Click Save Evaluation to store it for later review.
- Use Suggest System Prompt Updates to let the evaluator propose prompt improvements. Show Diffs compares the suggestion with the current prompt, and Apply Suggestion (from either view) saves it to your editing copy of the agent, just as if you had edited the prompt yourself, so your next test chat uses it. Suggestions aren't available for Auto or a combo agent, which have no single prompt to rewrite; evaluate the agents they use instead.
All saved evaluations are viewable via View all evaluations in the Evaluations section. Evaluations from a batch also show how fast the replies were and what they cost. Compare versions at the top plots each version as one dot on two measures you pick: quality (one evaluator's average score), your rating, cost per reply, time to first text, reply time or tokens per second. It starts with quality against cost; hover a dot for its numbers, or click it to jump to that version's evaluations. Each version has its own colour. With Group by version off, every evaluation is also a faint dot of its own that opens it. With versions grouped, you can also order them by any of those measures. When you evaluate an agent with unsaved edits, Evaluate this chat and Batch evaluate ask you to name that version, so its results aren't all filed as "currently editing"; the same edits are offered the same name next time. Narrow the list by agent, version, evaluator and source (manual or batch), or search mock users, verdicts, your notes and topics. With Group by version on, evaluations are grouped by agent and version, the current and deployed versions are labelled, and each group shows its average score from each evaluator and your average rating, all out of 10. Scores from different evaluators are never averaged together, since one may score out of 5 and another out of 10. Each row shows the evaluator's score, your rating and the first sentence of the verdict; clicking it opens that evaluation with the conversation it scored, the full verdict, and your rating, which you can add or change there. Batch in the Source column opens that batch's results. Click a column heading to sort. Download report opens a report of the evaluations shown (filters applied): a summary of each version's averages, then every evaluation with its full verdict and your note, ready to save as a PDF from the print dialog.
Evaluator agents
An evaluator agent is an agent whose job is to score test chats. Create one with + in
the Evaluators box of the Evaluations section. It opens the agent editor with the
role already set to Evaluator and a starter prompt that ends with a Score: X/10
line; change the criteria to suit your app. Any agent except a forwarder can be made an evaluator, or
an ordinary agent again, with the Role field in the agent editor. The role takes effect
at once and is not part of the agent's versions.
- Only evaluator agents, and the built-in evaluator, are offered when choosing an evaluator, so an ordinary agent can't be picked by mistake.
- Agent lists show evaluators under their own Evaluators heading. You can still test an evaluator like any agent: chat with it, or choose it as the agent to evaluate.
- Auto never routes a user's message to an evaluator, and evaluators don't appear in the routing settings.
- An evaluator should put its score on its own line, such as
Score: 8/10(any scale, written as X/Y or "X out of Y"), so it can be read and averaged.
Batch Evaluation
Batch evaluate, in the Evaluations section, runs many test chats at once, in the background on our servers. In each run a mock user chats with the agent for a few turns, then the evaluator scores the chat. You choose:
- the agent to test, or Auto (router). The batch tests the version your test chat uses when you start it, unsaved edits included, even if you keep editing meanwhile;
- optionally, up to four variants to compare, under Compare. Each variant is a version of the agent (the current one, the deployed one, or a saved version) and a model. A model chosen here applies to this batch only and is never saved to the agent, so you can try a configuration without saving a version. Every variant gets exactly the same runs, and the mock user and the evaluator are the same for all of them, so their scores compare directly. For a combo agent, the model applies to the combo itself, not its sub-agents. Auto is tested as it is, without variants;
- the evaluator;
- one or more mock users;
- the number of runs, and a range of turns per run (1 to 10). Each run gets a number of turns picked at random from the range. A mock user may still end a chat early when it reaches a natural end;
- optional topics, one per line. Runs go through every mock user with every topic, and each mock user is told what it wants help with in that run. Suggest topics adds three topics written for this app and the agent you are testing, below the ones already there; edit or delete any you don't want.
A batch can have at most 200 turns in all, counting every variant's runs, and one batch runs at a time per app. Before you start, the window shows the total and about how many messages the batch will use: two per turn (the mock user and the agent) and one per run for the evaluator, counted on the app admin's plan like any test chat. Progress shows in the Evaluations section; you can keep working, or cancel, which lets chats already under way finish and skips the rest. If the app admin runs out of credits, the batch stops. You can close the builder while a batch runs. If our servers restart meanwhile, the batch pauses and continues the next time you open the builder.
View results lists every run with its mock user, topic, turns, score and speed, and the batch's averages. Replies are streamed, as in the chat. Time to first text runs from sending the message to the first piece of the reply, and doesn't depend on how long the reply is; it is blank for replies that arrive in one piece (combo agents, forwarder agents and output other than chat). Reply time runs from sending the message to having the complete reply. Both include any routing, document search and tool calls, and for each the batch shows the average and the time 95% of replies came in under. Throughput is how fast the answer was written: output tokens per second from its first text to its end, leaving out routing and tool calls. It is blank for replies that arrive in one piece. Cost per reply is what the agent's model calls cost for each reply, as OpenRouter reports it, before Backprompter's fee: routing, tool steps and document search included. Mock user and evaluator messages are not counted. Click a run to read its conversation, with each reply's times, tokens and cost, and add your own rating. A batch that compares variants also shows each variant's average score and speed, with the best score marked, and a side-by-side table: one row per mock user and topic, with each variant's score in its own column. Click a score there to read that conversation. Batch scores appear in the ratings when the Scores picker is set to the evaluator the batch used; each variant counts as a version of its own there.
If the app's admin has set evaluation rules in Team Policies, every evaluator follows them — the built-in one and any evaluator agent.
Agent Versions
Every time you edit an agent and click Test Now, an editing version is created automatically. You can also create explicit snapshots at any time.
- Click Versions in the agent actions to open the Versions modal.
- Select any version to view its metadata and system prompt.
- Use Load Selected Version to restore a version for further editing.
- Use Promote to Default to make a version the active one for the agent.
- Use Compare Prompts (from the edit modal) to diff any two versions side-by-side.
Agents can be downloaded as JSON (⬇️ button) and re-uploaded (⬆️) to the same or a different app.
Files & RAG
Upload files to an app so agents can retrieve relevant content at query time (Retrieval-Augmented Generation).
- Click 📁 Files in the app actions bar.
- Upload files (text, PDF, Office docs, code), drag them onto the Files window, or fetch a URL.
- Select one or more files, choose or create a Collection, and click Index for Search.
- On the agent, set RAG to Knowledge Base and choose the collection.
New version of a file: select it and click Replace…, drag the new version onto that file in the list, or upload a file with the same name and choose to replace it when asked. The file keeps its place: same collection and description, and agents that use it keep working with nothing to re-attach. An indexed file is re-indexed in the background; until the new version is ready, searches use the old one, and if indexing fails the old version is kept. Replacing costs the same as uploading. The file list shows when a file was replaced, since evaluations from before that were run against the old version.
Files can also be attached directly to a single message using the Attach Files button in the chat composer.
Voice Chat
Backprompter supports real-time voice conversations using Deepgram's streaming speech-to-text and text-to-speech. Click the Voice button in the chat composer to start a voice session. The voice status indicator at the bottom of the chat pane shows the current state (idle, listening, speaking). In the builder's test chat, voice runs the same version as typed messages, including edits you applied with Test Now but have not saved.
Inviting Teammates
You can invite other people to build on an app with you. Everyone uses their own Backprompter account — there is no shared password, and each person's edits are kept in their own working copy, so two people editing the same agent never overwrite each other.
Every app has one admin (whoever created it). People you invite are editors, or on the Enterprise plan you can also invite auditors, who review agents without changing them.
| Action | Admin | Editor | Auditor (Enterprise) |
|---|---|---|---|
| Chat with agents, evaluate them (single and batch, saved versions included), view results | Yes | Yes | Yes |
| See agents' instructions and settings, what saved versions contain, files and tools | Yes | Yes | On Enterprise, if you allow it |
| Suggest system prompt updates | Yes | Yes | No |
| Create and edit mock users and evaluator agents | Yes | Yes | Yes |
| Create and edit other agents, versions, knowledge base, tools | Yes | Yes | No |
| Connect Slack, manage secret codes | Yes | Yes | No |
| Deploy or unpublish the chat | Yes | On Enterprise, if you allow it | No |
| Create or revoke API keys, pay the production fee, Stripe payments | Yes | No | No |
| Read team policies | Yes | On Enterprise, if you allow it | On Enterprise, if you allow it |
| Set team policies (guardrails and evaluation rules) | Yes | No | No |
| Change BYOK keys | Yes | No | No |
| Invite or remove teammates, change their role | Yes | No | No |
| Delete the app | Yes | No | No |
To invite someone, select the app and click 👥 Team, then enter their email address (on Enterprise, also pick editor or auditor). How many people one app can have depends on your plan: up to 5 editors per app on Developer, and 10 collaborators per app on Enterprise unless your license says more. Pending invitations count toward that limit, so removing someone frees a place. Anyone invited can leave an app at any time from the same panel. The Free Trial cannot invite anyone, but a Free Trial account can be invited to other people's apps.
On Enterprise the Team window also has three switches for the app: Editors can deploy (they can then deploy and unpublish the chat from the Deploy window), Editors and auditors can see the policies (read only; only you change them) and Auditors can view agents, files and tools. All three are off until you turn them on.
With that last switch off, auditors see your agents by name, summary and model only. They can't read the instructions or settings, what saved versions contain, your files, or your API tools and MCP servers, and the copilot won't show those to them either. They can still pick a saved version in Versions to chat with and evaluate. Evaluations stay as thorough as yours: Backprompter gives the evaluator the agent's instructions itself and tells it not to quote them. An auditor can still ask an agent in the chat to reveal its instructions, as any user can, so add a team policy telling agents never to do that if it matters to you.
If the address already has a Backprompter account, access is immediate. If not, the invitation waits — and they must sign up with the address you invited, because that is how it is matched. They also get an invitation email with a link to accept; opening it and signing in brings them straight into the app, whether they sign up with Google or with an email and password. Replying to the email reaches you directly.
Team Policies
As the admin, you can set rules that every agent in the app must follow, whoever built it. Select the app and click 🛡️ Policies. Only you can change them, and they aren't available on the Free Trial. Editors and auditors don't see the button or the rules, unless you are on Enterprise and turn on Editors and auditors can see the policies in the Team window; then they can read them. There are two boxes; fill in either, both, or neither:
- Guardrails for all agents — e.g. "Never give legal or medical advice. Never share customer personal data." They apply to every agent run: in the builder, the deployed chat, the API, Slack, voice and MCP clients.
- Rules for evaluations — how evaluations must be done, e.g. "Deduct points for any answer not grounded in the app's documents." They apply to every evaluation, with the built-in evaluator or an evaluator agent a teammate made, on top of the guardrails.
Backprompter adds your rules to the start of each agent's prompt on the server, marked as taking precedence over the agent's own instructions, its documents, and anything asked in the conversation. Where an agent's instructions conflict with them, your rules win. Boxes you leave empty add nothing at all.
- Changes reach new messages within about 30 seconds.
- Policies work through the prompt, so capable models follow them reliably — but they aren't a filter that blocks a reply outright.
- Unless you share them, editors aren't told a policy exists. If an agent seems to ignore part of its instructions, a policy may be why.
Billing & Credits
Backprompter has three plans. See the Pricing page for the full rate table; this is the short version.
Plans
- Free Trial (free) — for exploring and prototyping in the builder UI. Includes up to 2 agents, and a one-time lifetime allowance of 50 test messages or $1 of model usage (whichever comes first), which indexing files counts towards; past the $1, you can't add more files. Email sign-ups must verify their address first. Deploying in any form (chat UI, API keys and SDK, MCP, Slack), voice chat, inviting teammates and team policies are not included.
- Developer ($5 / month) — for shipping to real users. Unlimited agents and messages, deployed chat UI, API keys, SDK integration, MCP, Slack and voice, team policies, up to 5 editors per app and 10 batch evaluations a month. Beyond the monthly fee, usage is pay-as-you-go, drawn from your credit balance. Upgrade from the billing panel.
- Enterprise (monthly license) — everything in Developer, plus auditors, 10 collaborators per app (more on request), switches for whether editors can deploy and who can see the policies, and no limit on batch evaluations. Contact us to move to Enterprise. Accounts that were on the earlier Dev Pro plan are now Enterprise.
Sign up with a permanent email address: disposable and temporary-mail addresses are refused.
Credits & pay-as-you-go
Developer and Enterprise usage is charged against a prepaid credit balance shown in the billing badge in the app header. You top up credits from the billing panel. Charges include a per-call orchestration fee, the model's API cost plus a service markup, and storage for app configuration and RAG documents. Exact rates are on the Pricing page.
The builder helpers — Suggest System Prompt Updates, the Backprompter Copilot and Suggest topics in Batch evaluate — are charged for their model cost only, with no orchestration fee. They are charged to the admin of the app you have selected, like any other work on the app, and use the app's BYOK key when it has one. When the copilot searches the web, the search fee (about $0.01, at most two searches a question) is part of that cost. With no app selected — before you have built one — copilot questions are charged to you.
API Access
You can call any agent from your own backend without using the Backprompter UI. Full details are available in the auto-generated API Reference for each app:
- Select an app in the sidebar.
- Click 🔌 API in the app actions bar to open the API Reference page.
-
To authenticate server-to-server requests, go to 🚀 Deploy and click
Generate API Key. Pass the key as the
x-bp-api-keyheader.
The API Reference page documents every endpoint and shows live example payloads tailored to your app's agents.
Your app's keys are listed under API access in the 🚀 Deploy dialog, with when each was created and last used. Click Revoke to switch one off for good — anything still using it (a server, an MCP client) stops working at once. An app can have up to 10 active keys; revoking one frees a slot. Only the admin can see, create or revoke keys.
Use Your Agents from MCP Clients
Backprompter is also an MCP server, so MCP clients — Claude Code, Cursor, Claude Desktop and others — can call your agents as tools. A client connects with one of your app's API keys and sees each agent you've exposed.
- On each agent you want to offer, tick Expose via MCP and save the agent.
- Create an API key under API access in the 🚀 Deploy dialog.
- In the same dialog, open MCP server. It shows your MCP endpoint, the agents it
currently offers, and ready-to-paste setup: a
claude mcp addcommand for Claude Code, and a JSON config for Cursor and other clients that take a URL and headers. ReplaceYOUR_API_KEYwith your key.
The key goes in an Authorization: Bearer <key> header (x-bp-api-key also
works). Sign-in with OAuth isn't supported yet, so use a client that can send a header. For Claude
Desktop, add the server through the mcp-remote bridge in its config file (Settings →
Developer → Edit Config), then fully quit and reopen it:
"mcpServers": {
  "my-app": {
    "command": "npx",
    "args": ["-y", "mcp-remote", "<your MCP endpoint>", "--header", "Authorization:${AUTH_HEADER}"],
    "env": { "AUTH_HEADER": "Bearer YOUR_API_KEY" }
  }
}
What the client sees
- Each exposed agent is one tool named
<app>_<agent>, e.g.ApexAI_converse(letters, digits,_and-only). Renaming the app renames its tools. - The tool's description is the agent's Summary. Clients decide when to call a tool from its description, so say what the agent knows that the client's own model doesn't — your documents, your data — and when to use it. A vague summary means the agent rarely gets called.
- A call takes a
message, and optionally aconversationof earlier turns. Each call is otherwise independent: the agent doesn't remember previous calls.
Use an Agent as a Tool in Another App
A Backprompter agent can call an agent from another of your apps (or someone else's) as a tool, through this MCP server. Exposed agents don't appear in any app's tools by themselves: the calling app adds the MCP server like any other.
- In the app that has the agent: tick Expose via MCP on the agent and save it, then create an API key under API access in the 🚀 Deploy dialog. Copy the MCP endpoint shown under MCP server in the same dialog.
- In the app that will call it: open 🧰 Tools, click + Add MCP server,
and give it a name (e.g.
support_app), the MCP endpoint, Auth Bearer token, and the key. Click Save tools; the server's card lists one tool per exposed agent. - In the calling agent's Tools dropdown, tick the server (or just that agent's tool) and save the agent.
To have one agent hand work to another in the same app, use a combo agent instead; it needs no key. This route is also how to try a forwarder against an agent you built in Backprompter.
- Each tool call is billed like an API call to the agent, to the app admin's account.
- Code-execution (data-analysis) agents are never offered, because their code runs in the end user's browser.
- Each key is limited to about 30 tool calls a minute.
- Backprompter agents can call each other over MCP (a client calls app A's agent, which uses app B's agent as a tool), but only one level deep — so agents that point at each other can't loop.
- Admin guardrails apply to agents called this way, as everywhere else.
Deploying a Chat UI for End Users
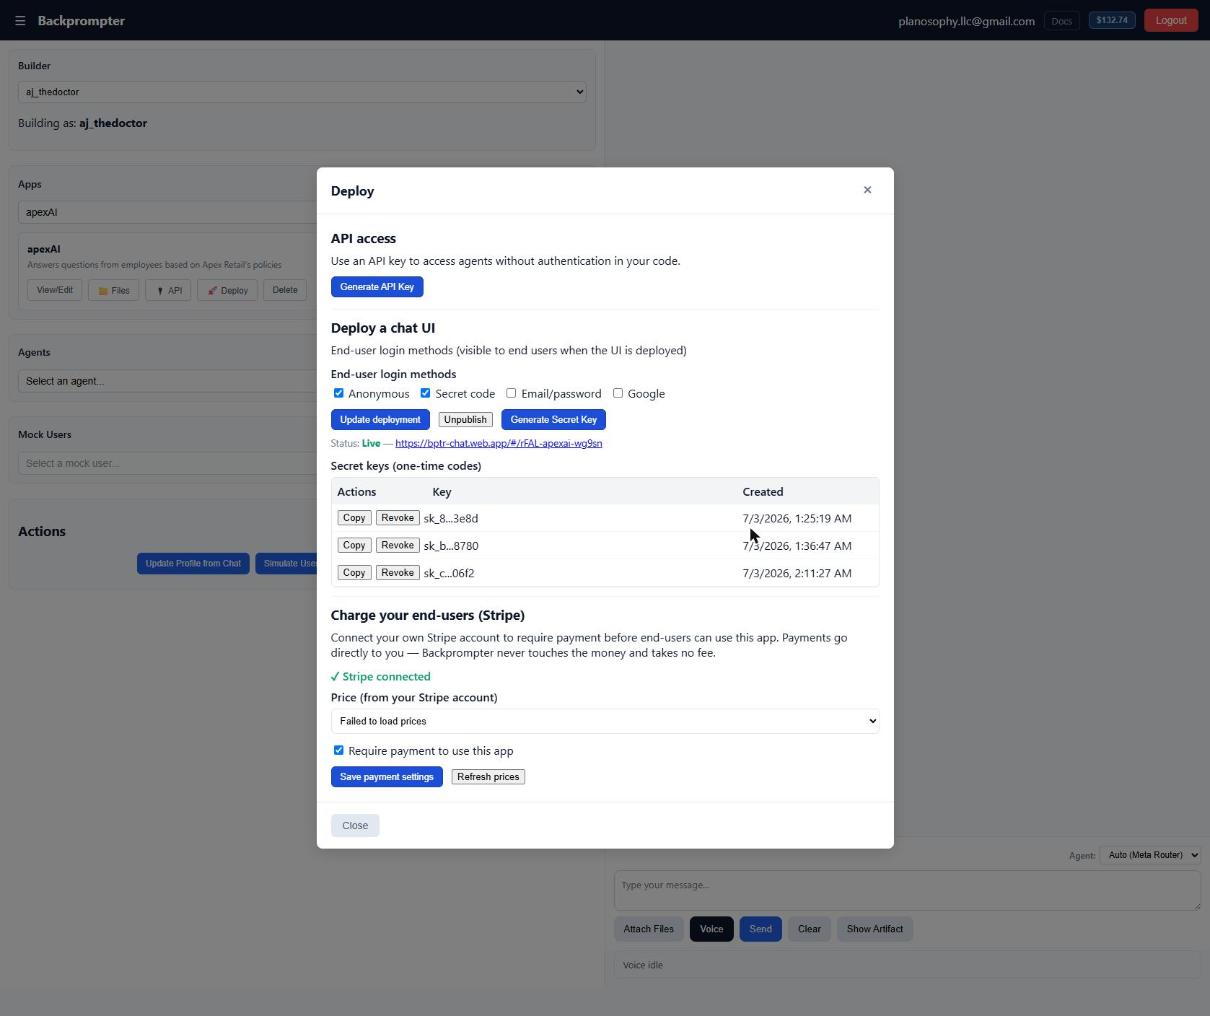
Backprompter can deploy a hosted chat interface so your users can interact with your agents without needing access to the developer UI. The deployed UI is a separate, standalone web app.
- Select the app you want to deploy.
- Click 🚀 Deploy in the app actions bar.
- Under Deploy a chat UI, configure the End-user login methods (see below).
- Under What the deployed chat shows, tick any extras: Show retrieved sources and Show voice mode are off unless you tick them. Stream replies as they're written is on unless you untick it: answers appear word by word, while charts and other attachments still arrive whole. While it's on, you can also tick Show intermediate steps: until the answer starts, the reply says when documents are being searched or a tool is running.
- Click Deploy UI.
- Wait for the deployment to complete. A link to your live chat URL will appear.
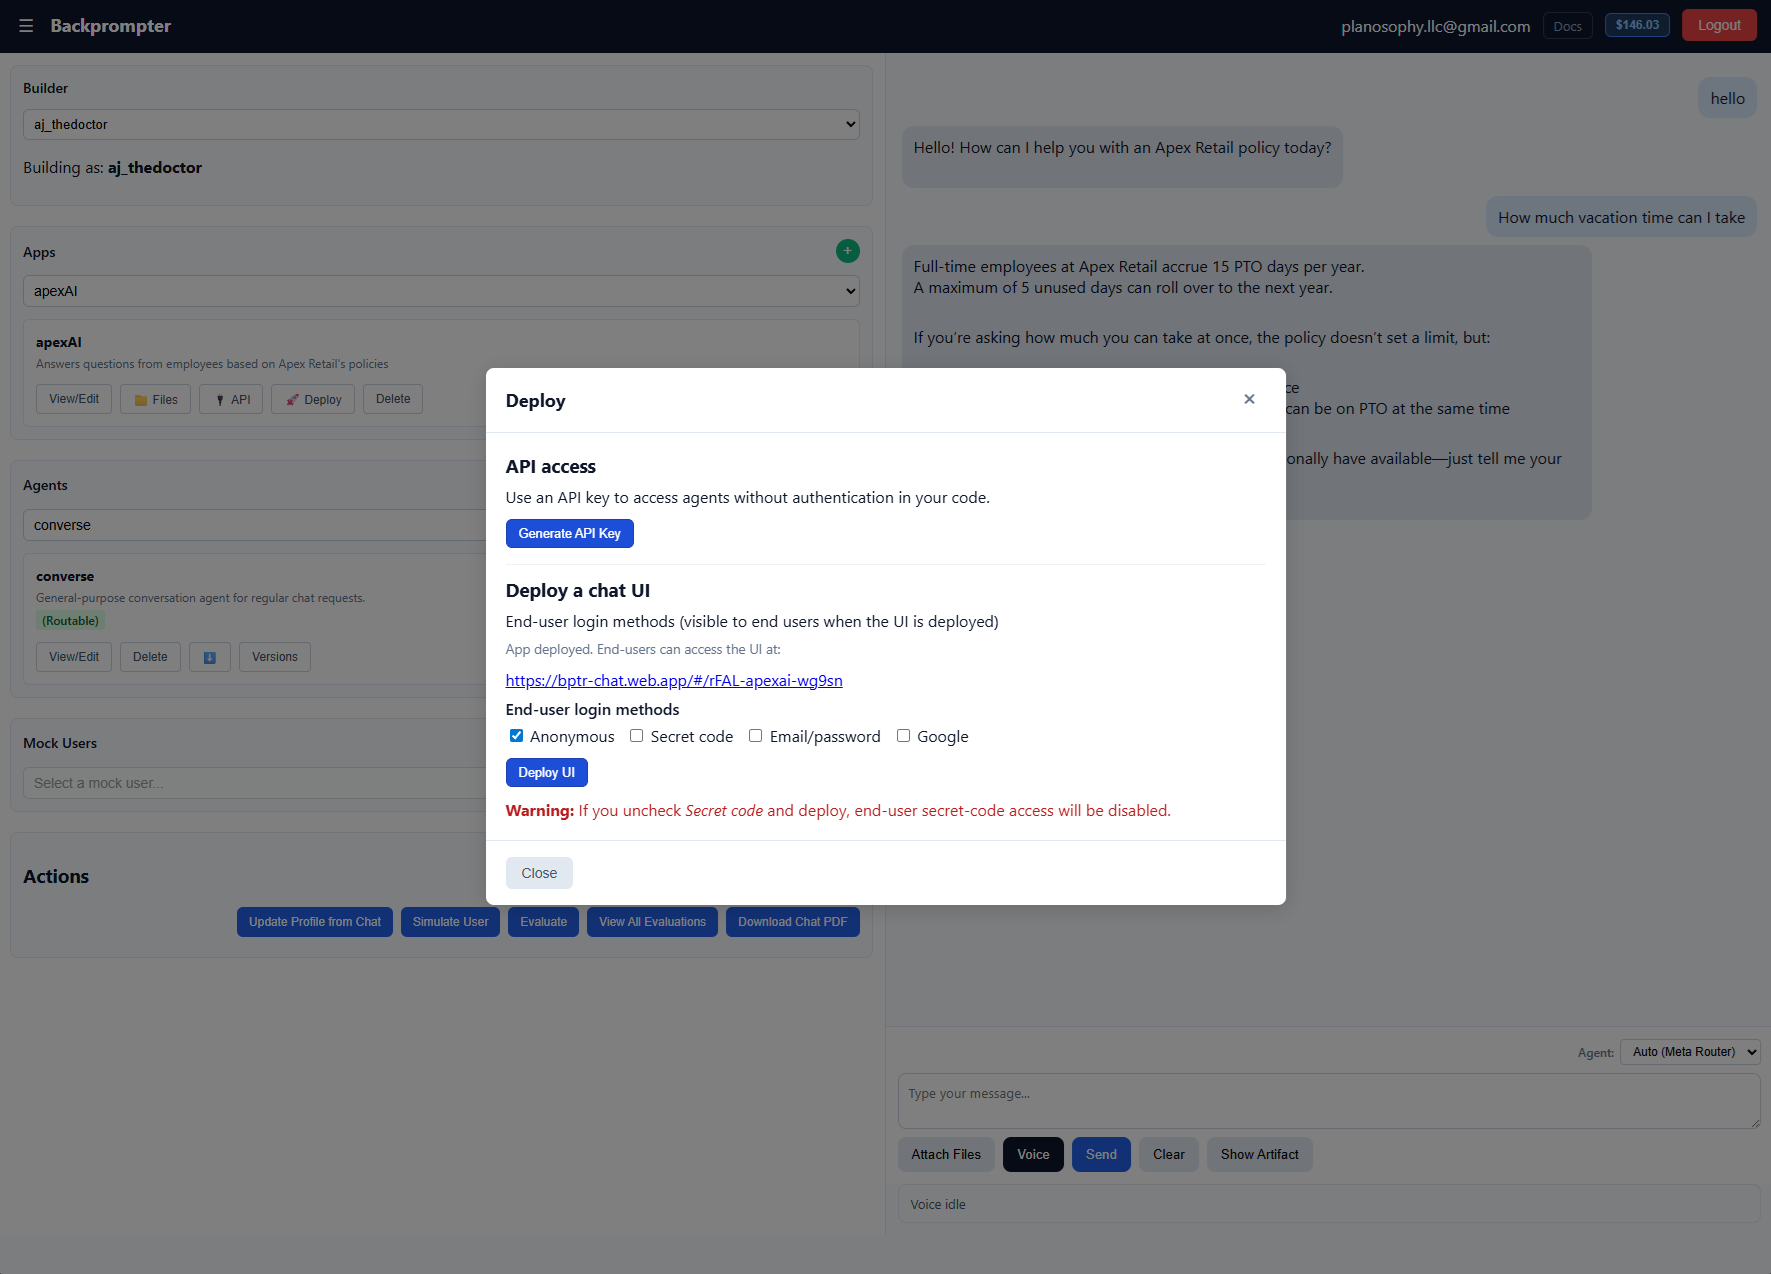
You can re-deploy at any time to update settings (e.g. change auth modes or add new agents). Existing users are not affected until they refresh.
Auth Modes
Choose one or more methods your end users can use to sign in:
- Anonymous — users get a guest session automatically with no sign-up required. Best for open demos or public tools.
- Secret code — users enter a one-time secret key to gain access. Useful for invite-only products or beta testing groups (see Secret Keys).
- Email / password — users create an account with an email and password.
- Google — OAuth login with a Google account.
Secret Keys
When Secret code is enabled, click Generate Secret Key to create a new one-time access key. Secret keys are shown only once — copy and distribute them before closing the modal.
The keys table shows all existing keys with their creation date. You can revoke individual keys at any time using the Revoke action in the table.
Your Deployed URL
The deployed chat UI is hosted at:
https://bptr-chat.web.app/#/<your-app-id>
Share this URL with your end users. The #/<your-app-id> fragment ensures users
land directly in the correct app.
Slack
Any app can also answer inside a Slack workspace, with no code and no separate deployment.
- Select the app and click 🚀 Deploy.
- In the Slack section, click Add to Slack and approve the install.
- In Slack, invite the bot to a channel:
/invite @Backprompter - Mention it (
@Backprompter what are our refund rules?) or send it a direct message.
By default the meta-router picks the best agent for each message. You can pin a single agent instead from the same Slack section, and disconnect the workspace there at any time.
Conversation history. Nothing is stored; each time, the bot reads what came before from Slack itself, so the agent sees what the people in the conversation can see.
- In a thread (in a channel or a direct message), the agent gets the thread's latest 20 messages as the conversation so far.
- In a direct message, the agent gets up to 20 earlier messages from the last 24 hours as the conversation, and answers straight in the DM rather than in a thread.
- When mentioned in a channel outside a thread, the agent gets the channel's last 15 messages as background (who said what, each cut to 1,500 characters; thread replies aren't included), and answers in a thread under the question.
Files. People can share files with the bot: attach them to a direct message, or to a message that mentions it. Images (PNG, JPEG, GIF, WebP) and PDFs are passed to the agent as attachments; text files (plain text, CSV, JSON, Markdown, code) are read into the message. Word, Excel and PowerPoint files are passed as the PDF copy Slack makes of them, so the agent's model needs to accept PDFs. Slack makes that copy a few seconds after the upload; if it isn't ready within about 10 seconds, the reply asks the person to share the file again. Asking about a file later in a thread or direct message ("what does it say about May?") uses the files from the latest earlier message in that conversation that had any. Up to 5 files a message, 10 MB each. Other files are named back in the reply as not read. A combo agent reads text files but not images, PDFs or Office documents.
@Backprompter — Slack gives an app no way to take a different handle per
workspace. Replies, however, are posted under your app's display name and logo, so an
app called "Docs Assistant" answers as Docs Assistant.
Charging Your End Users (Payments)
You can require end users to pay before they can use your deployed app. Backprompter uses Stripe Connect: you link your own Stripe account and payments settle directly into it — Backprompter takes no cut and never touches your customers' money. It only records who has paid and enforces access at run time.
Set it up
It's all done in the Backprompter UI — no code, and nothing to configure in the Stripe dashboard.
- Open the Deploy modal for your app and go to Payments. Click Connect Stripe and authorize with your Stripe account (Stripe Connect onboarding).
- Choose the Price to charge — your account's active Stripe prices are listed for you. Recurring prices become subscriptions; one-time prices grant lifetime access.
- Enable the payment gate and save. That's it.
What end users experience
- When the gate is on, requests are blocked with a 402 Payment Required until the user pays.
- The hosted chat UI (and the SDK) surface a checkout link; after paying, access is granted automatically.
- Subscribers see a Manage subscription button in the hosted chat, which opens Stripe's own page to cancel, resume or change their card. There is nothing to set up in Stripe.
- Subscriptions are re-checked on each request — cancellations and expiries revoke access (with a short grace window); one-time payments grant lifetime access.
SDK Integration
Detailed guides for each deployment option.
Option 1 — Deploy a Chat UI (No Code Required)
The fastest path to production. Backprompter hosts a complete, polished chat interface for your end users — no frontend or backend code needed.
- Build and configure your agents in the Backprompter UI.
- Click 🚀 Deploy in the app actions bar.
- Choose the login methods you want your users to see (anonymous, email/password, Google, or secret code).
- Click Deploy UI. Within moments your app is live at:
https://bptr-chat.web.app/#/<your-app-id>
Embed the hosted chat in your website
Because the hosted chat is a normal web page, you can drop it into any existing site with an
<iframe> — no build step and nothing to host yourself. Replace
<your-app-id> with your App ID (shown on the Deploy modal and the API
Reference page).
Inline — embed the chat directly in the page
<iframe
  src="https://bptr-chat.web.app/#/<your-app-id>"
  style="width: 100%; height: 640px; border: none; border-radius: 12px;"
  title="Chat"></iframe>
Floating widget — a collapsible chat bubble in the corner
Paste this snippet before the closing </body> tag of any page. It adds a
floating button that opens and closes the chat in an overlay.
<!-- 1. Floating button + hidden chat window -->
<button id="bpChatBtn" aria-label="Open chat" style="
  position: fixed; bottom: 20px; right: 20px; width: 60px; height: 60px;
  border: none; border-radius: 50%; background: #2563eb; color: #fff;
  font-size: 24px; cursor: pointer; box-shadow: 0 4px 12px rgba(0,0,0,.15);
  z-index: 9999;">💬</button>

<div id="bpChatWindow" style="
  position: fixed; bottom: 90px; right: 20px; width: 400px;
  height: 640px; max-height: calc(100vh - 120px); display: none;
  background: #fff; border-radius: 12px; overflow: hidden;
  box-shadow: 0 5px 24px rgba(0,0,0,.2); z-index: 9999;">
  <!-- Replace <your-app-id> with your App ID -->
  <iframe src="https://bptr-chat.web.app/#/<your-app-id>"
    style="width:100%; height:100%; border:none;"></iframe>
</div>

<!-- 2. Toggle logic -->
<script>
  (function () {
    var btn = document.getElementById('bpChatBtn');
    var win = document.getElementById('bpChatWindow');
    btn.addEventListener('click', function () {
      var open = win.style.display !== 'flex';
      win.style.display = open ? 'flex' : 'none';
      btn.textContent = open ? '✕' : '💬';
      btn.setAttribute('aria-label', open ? 'Close chat' : 'Open chat');
    });
  })();
</script>Option 2 — Backprompter SDK on Your Own Frontend
Build your own custom UI while letting Backprompter handle authentication and agent calls. The SDK authenticates users through Backprompter's multi-tenant auth system, so users get persistent accounts and their data is scoped to your app.
Setup
<!-- 1. Include the SDK -->
<script src="https://cdn.jsdelivr.net/npm/backprompter-sdk/dist/backprompter-full.min.js"></script>

<script>
  // 2. Point the SDK at your app (find your App Key in the API Reference page)
  Backprompter.setAppKey('your-app-key');
</script>
Sign users in
// Email + password
await Backprompter.signIn(email, password);

// Anonymous (no sign-up required)
await Backprompter.signInAnonymously();

// Sign out
await Backprompter.signOut();
Call an agent
const result = await Backprompter.run({
  agentId: 'your-agent-name',   // omit to let the meta-router pick
  userPrompt: userMessage,
  conversationHistory,          // array of { role, content } pairs
  profileString,                // optional: personalise responses with a user profile
});

console.log(result.response); // agent's replyFull reference: Browser SDK Reference → — every method, with attachments, voice, conversation history, artifacts, custom data, vector search, and paid access.
Option 3 — Backprompter SDK on Your Own Backend
Call agents from your own server using a Backprompter API key. Your backend handles user authentication however you like; Backprompter never sees your users' credentials.
Generate an API key
- Open the 🚀 Deploy modal for your app.
- Click Generate API Key and copy the key — it is shown only once.
Install the server SDK
npm install backprompter-server-sdkCall an agent
import BackprompterServer from 'backprompter-server-sdk';

const bp = new BackprompterServer({
  apiKey: process.env.BACKPROMPTER_API_KEY,
  tenantId: process.env.BACKPROMPTER_APP_KEY,
});

const result = await bp.run({
  agentId: 'your-agent-name',
  userPrompt: req.body.message,
  conversationHistory,         // array of { role, content } pairs
  profileString,               // optional: any user context you want to inject
});

res.json({ reply: result.response });x-bp-api-key bypass Backprompter's Firebase auth
entirely. Your backend is responsible for verifying that the caller is allowed to make the
request before forwarding it to Backprompter.
Full reference: Server SDK Reference →
— every method, including per-user data storage with forUser(), identity tokens,
API key scopes, and how payments behave on API-key calls.
Using Your Own Login
Options 2 and 3 are not exclusive. If your app already has a login, you can keep it and still give your frontend the full SDK. Your backend exchanges your own user id for a short session token. Your frontend signs in with that token. Backprompter never sees a password.
On your backend
// behind your own session check
app.post('/api/bp-token', requireMyAuth, async (req, res) => {
  const { customToken } = await bp.createUserToken({
    externalId: req.user.id,     // your own user id
    email: req.user.email        // a label for your dashboard
  });
  res.json({ customToken });
});
On your frontend
const { customToken } = await fetch('/api/bp-token').then(r => r.json());
await Backprompter.signInWithCustomToken(customToken);

// everything now works as a signed-in end user
await Backprompter.saveData('preferences', { theme: 'dark' });
await Backprompter.run({ agentId: 'analyst', userPrompt: 'Hello' });
Backprompter derives a storage id from your App Key and your external id, so the same user
always returns to the same data. If you would rather keep every call on your server, use
bp.forUser(yourUserId) from the Server SDK instead — see the
Server SDK Reference.
Tutorials
Step-by-step walkthroughs for the most common Backprompter workflows. Open the Tutorials page →
Tutorial 1 — No-Code UI Deployment
Create agents and deploy a hosted chat UI for your clients with zero code.
Tutorial 2 — Frontend Integration
Use the SDK in your own UI with Backprompter's built-in auth. No API key in the browser.
Tutorial 3 — Backend Integration
Call agents from your own server with an API key. Bring your own auth.
Tutorial 4 — Agent Evaluation
Simulate conversations, score with an AI evaluator, collect feedback, iterate.
Tutorial 5 — Tips & Tricks
Combo-agent orchestration patterns and developing prompts with agents.